Custom flags


High quality flags made for you


Customize your flag
If you have your own design and you want to make a flag with certain measurements, use our configurator.
Once you have selected all the parameters you will be able to download a PDF template with the exact size in which you can enter a personalized design.
Delivery date: between 7 and 10 business days
The order must be made and paid (Visa, MasterCard, Paypal, Bank transfer) before 2:00 p.m from Monday to Friday.
The file must be sent before 2:00 p.m. from Monday to Friday.
Delivery dates are estimated, on the islands, Cueta and Melilla it will take two or more working days.
The delay in sending the file, if the file is not valid or the proof of payment is after the specified time, will lead to delays in the delivery date.
Instructions
Supported file formats
The supported files to make the custom flags or banner are PFD, JPG, TIFF.
When choosing the measurements or placing your order you can download a pdf template where you can include your design, if you wish you can also attach a JPG file of the final design at low resolution to check it, these files can be included in a single compressed .ZIP file or .RAR

We recommend that you also attach the JPG file of the final design at low resolution, this will allow us to check the correct location of the document layers.

High resolution JPGs are suitable for large format digital printing.

Image size cannot exceed 300MB.
I have a double-sided file, how do I send it?
Although double-sided printing is not usual in the printing of flags by sublimation or digital printing, you can send us the files independently, one for each side.
We will call Face A Observe and it will correspond to the outer part: A_name of the file
We wil call the B side Reverse and it will correspond to the inner part: B_name of the file
Format orientation
By clicking on download template you will get a PDF file with the orientation and dimensions in centimeters selected. The orientation of the format must match the option selected in the order settings. Enter the height of the flag first and then the width (base) of the flag. This is important to determine the correct arrangement of accessories, such as rings sheaths ...
Design template
During the document size selection process, our system will automatically generate a template in PDF format with the measurements you set. We recommend downloading this template to your system, inserting the graphic of your design into it and saving it in PDF format, taking into account the indications in the previous section. Remember not to bring text or important design elements to the edges of the design to avoid loss when hemming the fabric.

Document resolution and scale
For the printing of pieces up to 3m in length for its longest part, the optimal resolution of a document is between 100-150 dpi (pixels / inch) at 1: 1 scale (actual size) of the final image to be printed. For designs greater than 3m, a resolution of 100 dpi is sufficient to achieve a good result.
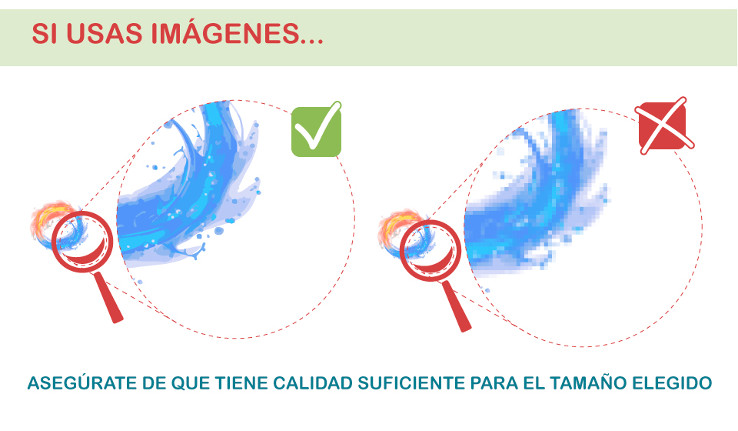
Remember that poor resolution can lead to poor quality finishes, such as blurry text or images.
Here is some reference information that may be helpful when making your design.
Relationship between document output resolution and image sharpness
Color and ICC Profile
Final artwork must be submitted in CMYK color mode. A common mistake is to submit files in RGB, a valid color mode for displays but not for the following routes depending on the software used:
- Adobe Illustrator : File> Document Color Mode> CMYK Color
- Adobe Indesgin: Editing>Transparency Blending Space>Document CMYK
- Adobe Photoshop: Image>Mode>CMYK Color
To ensure optimal color reproduction * in your design, you need to assign the appropriate color profile to your documents. ClickPrinting uses the FOGRA39 Coated Color Profile (ISO 12647-2: 2004). You can assign the color profile to your documents through the following path:
Adobe Illustrator / Indesign / Photoshop: Edit>Assign Profile
Files generated with RGB profile or PANTONE COLORS will be converted with this standard Coated FOGRA39 seperation profile (ISO 12647-2: 2004).
* Due to the physical-chemical processes generated in the printing processes, there may be a color variation of + -5%. For this reason, and despite having state-of-the-art printing equipment, unfortunately we cannot guarantee the excat reproduction according to the colors shown on the screen. Color deviations generated for this reason cannot be a reason for a claim.
Typography
To ensure the correct repdroduction of the typeface families used in your design, we recommend converting all texts into paths. In this way, the converted text outlines become compound paths fixed within the document, thus avoiding the possibility that the front may undergo any type of modification.
You can convert your texts into outlines through the folllowing routes depending on the software used:
- Adobe Illustrator & Adobe InDesgin: With text selected: Text> Create Outlines
- Adobe Photoshop: Hover over the layer where the text has, then press the right mouse button and click on the Create work path option
Remember to carry out this step once you are sure that your text will not undergo modifications, since, when you convert text to a path, it will no longer be editable.
Overprint / Reservation
Overprinting consists of the superposition of two different colors within a common area, resulting in the generation of a third color, a result of the mixture of the previous two. The opposite phenomenon is called Reserve (not to be confused with Reserve of white), and in it, the upper color creates a coverage thanks to which, its printing is made on a ''clean'' surface (in white) adapted to the contours of its shape.
For a variety of reasons, the overprint option can be turned on without you being aware of it, which can lead to undesirable results, such as unexpected colors appearing, hidden elements appearing behind an image, and even the disappearance of texts that should be visible (we must pay special attention to white texts).
However, it may happen that the overprint option is a deliberate choice. For example, if you print a 100% magenta fill on top of a 100% cyan fill, the overprint color will be purple-blue (overprint option active in scheme above). As long as this is anticipated, the overprint option is adequate.
Check the Overprint settings of your documents through the following routes depending on the software used:
- Adobe Illustrator: Window > Attributes [+ info]
- Adobe Indesign: Window > Output > Attributes [+ info]
Consider disabling Sompreimp options. padding & overprint trace to avoid unexpected results
Also, you can check possible errors caused by overprinting once you have exported your document to PDF through the following route:
Adobe Acrobat: Tools > Print Production > Output Preview
Transparency
If your document contains transparency effects (such as objects with soft shading or gradients), we recommend that you rasterize the entire artwork and choose to submit the final art in TIFF format in these cases. In this way, the possibility of errors with respect to other transparency treatment processes such as flattening is reduced. Although flattening divides a transparent artwork into vector-based zones and rasterized areas, we cannot guarantee a "stitching" effect (probably not wanted) where rasterized and vectored overlap.
You can export to TIFF format directly from Adobe Illustrator and Adobe Photoshop: File > Export > Select TIFF format
Bleeding
Whenever your design contains images in contact with the physical limits of the printed support (bleed images), the final art must have an excess of image beyond the cut line, called bleeding.
Thanks to bleeding, we can ensure that your design will have a perfect finish. Otherwise, the tolerance range of digital cutting machines can produce white margins on some of the edges of your design.
The bleed margin must be 2mm along the perimeter of the document for any product, except for double-sided printed rigid media, where the bleed will be 10mm along the entire perimeter.
For example, if you want to print a 100x150cm piece, the size of your document will be 100.4x150.4cm (after adding the 2mm along the entire perimeter)
If that same piece is printed on a rigid and double-sided support, the final size of the document will be 102x152cm
By default, all our templates generate a 2mm margin along the perimeter of the document.
By activating the File review box in the configurator panel, our technical team will ensure that your document has the correct measurements.
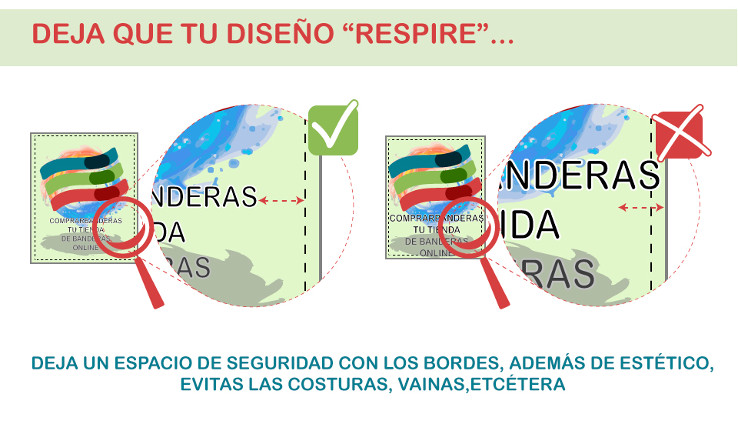
Safety margin
For the elaboration of the flags it is necessary to leave a safety margin both for technical reasons in order to avoid cutting a text or graphic element and from an aesthetic point of view to add "air" so that the design breathes and is more attractive to the viewer.
The safety margin, or quiet zone, is directly related to the size of the part, so the larger your design size, the wider this margin should be.
As a general rule, the security area of the content will be +/- 30mm.
If your piece has perimeter reinforcement, you must add a minimum safety area of 50mm along the entire perimeter.
In the case of a sheath, you must add a safety margin of 50 mm plus 100 mm for the upper and lower areas of your design corresponding to the size of the bag (for more information, see Finishing materials > Canvas > Sheath)
Sending files
Once you have placed your order and the designs, you can send them to us via email to the account info@comprarbanderas.es indicating your order number in the subject line or via Wetransfer, Dropbox, Google Drive or a similar service if the weight is greater than 20 Mb also indicating in the message your order number.


You can find your order number and the PDF template in the email you will receive after placing your order.
Maximum security in your purchases


 Instagram